Today I’m participating with some fellow Independent Stampin’ Up! Demonstrators, sharing our creativity globally through the above Blog Hop.
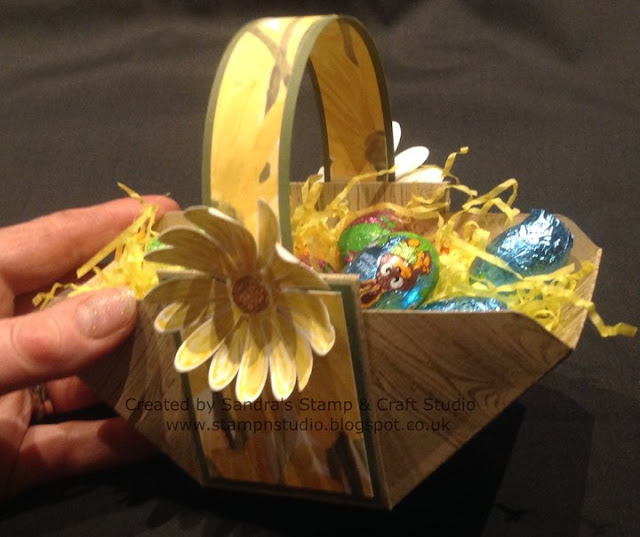
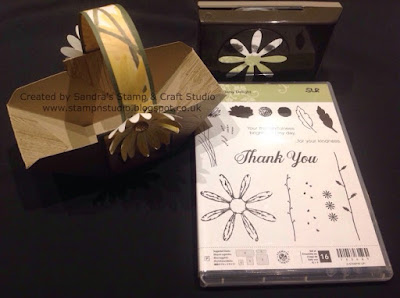
This month we have a Spring / Easter theme so for todays ‘hop’ I went back to recreate a project I made for a class several years ago, featuring the Envelope Punch Board #133774 to make an Easter basket for my 10-year old niece who will be staying with us over Easter.
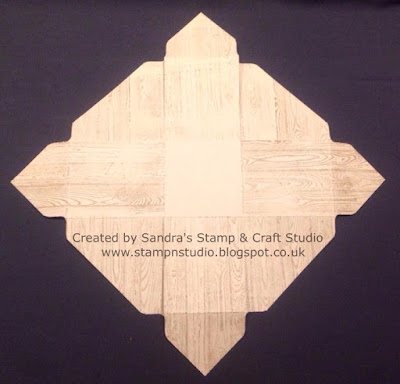
Start with an 8″ square of Crumb Cake card #121685. Insert into Envelope Punch Board #133774 at the 2″ measurement. Punch and score as far as you can go. Turn and repeat at the 2″ mark on all four sides. Flip over and repeat at 2″ on all FOUR sides, punching and scoring as you go.
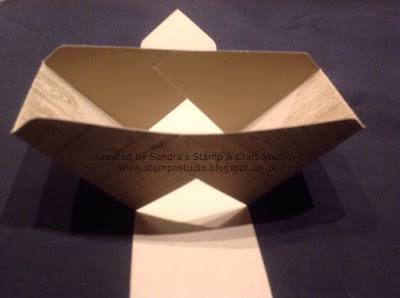
Hold card as in photo below and snip up from the bottom middle two sections up to the centre square. Turn and repeat on opposite side.
Using the Hardwood background stamp #133032 (W) #133035 (C) ink up with Soft Suede ink pad #126978 and stamp all over, using scrap paper and/or Post-It Notes to make off areas as required.
Bring the side panels in and attach in place, making sure the top is level. Apply Tombow Adhesive #110755 to the end triangles and glue inside the basket.
Apply Tombow to the remaining panels at the top on the triangle and lightly down each outside edges. Fold in and turn over the top triangle.
To decorate, cut FOUR panels of Always Artichoke card #108610 at 6.5cm x 5.5cm and FOUR panels of Delightful Daisy Designer Series Paper #144137 at 6cm x 5cm. Adhere together using Tombow adhesive and attach to each ends and sides.
For the handles cut strip of Always Artichoke card at 21cm x 2.5cm. Cut two strips of Delightful Daisy DSP at 20.5cm x 2cm. Adhere one to each side of handle (inside and outside), leaving a small border round all sides. Attach handle in place on the outside of the basket.
Curl the leaves slightly and attach two layers together, off-setting the centres. Attach a Gold Faceted Gem #144141 in the centre of each flower. Attach one flower to each end of basket handle.
Your basket is now ready to fill with shredded paper and small Easter Eggs.
I hope you have enjoyed my project today and perhaps be inspired to grab your Envelope Punch Board and make one for yourself.
Please enjoy the rest of your ‘hop’ around the globe today by clicking the ‘Next’ button to visit Ingrid and see the wonderful creations she has to share with you. We do really appreciate reading your lovely comments on our posts.
Sandra Roberts You are here !
Stampin’ Up! Sale-A-Bration promotion expires on 31st March so please remember to be quick to shop and snap up your FREE Sale-A-Bration product soon or give me a call.
Happy craftin’
Sandra
Contact me on : 07806 616704
For all your Stampin’ Up! requirements and Special Offers, please visit :
MY ONLINE SHOP http://www.stampinup.net/esuite/home/sandraroberts
Remember to quote this when you order from my Online Shop to receive random acts of kindness ‘thank-you’ from me after the end of the month.






I love your basket Sandra! Thanks for the great instructions. I can't wait to make one!
You did a great job with the Hardwood stamp. I thought you had used the Wood Textures DSPS. Your niece should love it!
I like this basket, I never made one before, so now I must try one 😉
Love the basket and how easy it seems to make it! TFS!
I’m a sucker for little gifts like this! Great job ????????Sandra!
I love this basket, goung to have a go for my grandchildren, thank you for the instructions
I can envision all sorts of Spring things tucked in your basket. TFS!
It's a very nice basket, I'm sure I'm going to make one!
What an adorable little basket Sandra. I love it and it looks so easy to put together. Thanks for sharing 🙂
That is super cute!
Cute basket, thank you for sharing
I'm sure your niece is loving this!